
Balecaster IV Surface
The Balecaster IV Surface, where the majority of our Crusade will be taking place. The main city on this continent is Nova Landing, where the first pilgrim ship, the Nova’s Resolve touched down, and humanity first set foot on the planet.
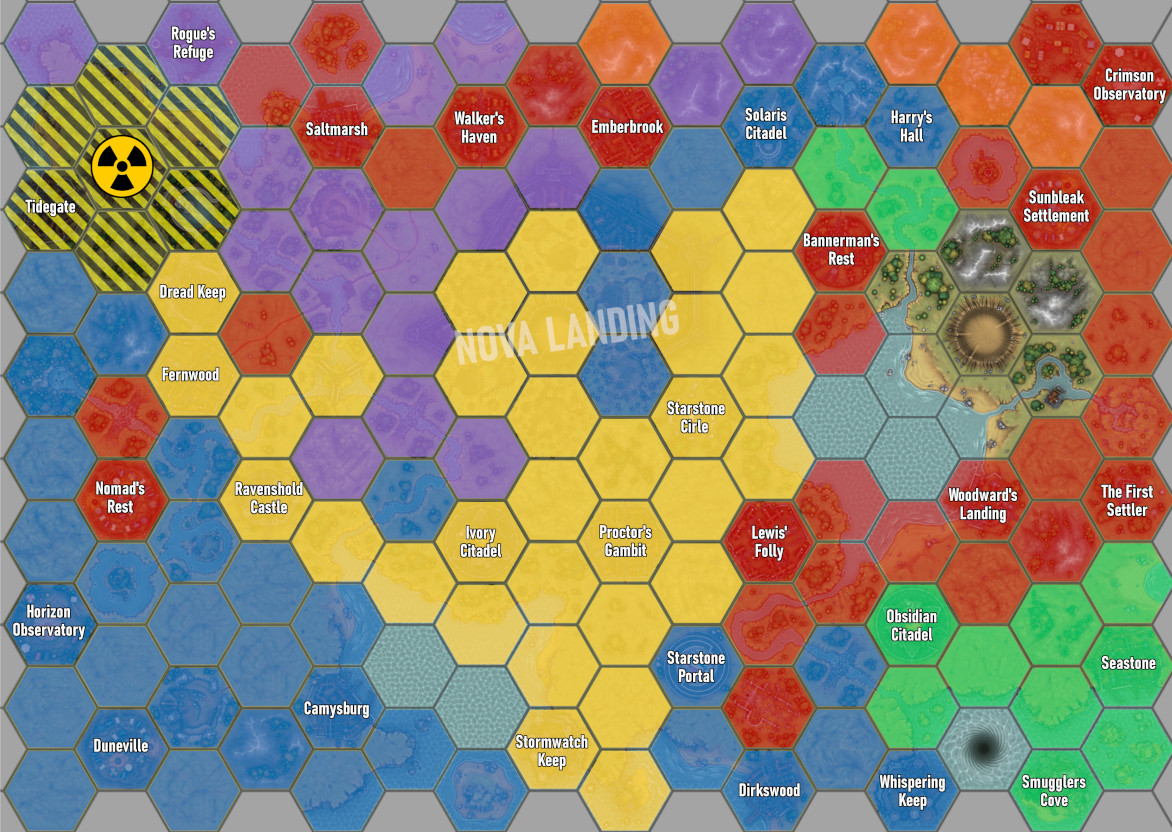
Click on the map to open a larger version in another window
Rad Fallout
For Phase 4, due to the recent launch of another warhead, armies are at risk of suffering damage both before the game begins and during the game.
Before Turn 1, after both players have set up but before any other moves have been made, Roll a D6 for every unit on the battlefield. On a 3+ that unit has succumbed to Rad Fallout and will suffer 2D3 wounds. Additionally, at the start of the controlling player’s Command Phase, they will need to take a Battleshock test for each unit currently on the field. If that unit fails, it suffers D3 wounds.
Rad Upgraded Armour: When testing against radiation fallout – both at the start of the game and in the following command phases – you will can take a normal or invulnerable save against the radiation damage (no bonuses for cover). In addition – if you either pass the battleshock check, or if you save ALL the radiation damage that might apply then your unit in NOT battleshocked.
Towns
Potential Starting areas for any of the alliances
- Tidegate
- Saltmarsh
- Walker’s Haven
- Emberbrook
- Bannerman’s Rest
- Sunbleak Settlement
- Ironridge
- Woodward’s Landing
- Seastone
- Dirkswood
- Lewis’ Folly
- Proctor’s Gambit
- Camysburg
- Duneville
- Nomad’s Rest
- Fernwood
Points of Interest
These will provide benefits to you and your allied forces
Castles
- Stormwatch Keep
- Whispering Keep
- Harry’s Hall
- Ravenshold Castle
Strategic Asset Granted: The first time a unit fails a Battle Shock test, you can choose to pass it instead.
Citadels
- Solaris Citadel
- Ivory Citadel
- Obsidian Citadel
- Dread Keep
Strategic Asset Granted: During the game, the first friendly Battleline unit to be destroyed can be returned to the player’s army and placed in reserve. This unit will not gain any additional XP/etc the second time it enters the battle. The initial unit will still have to roll for its out of action tests at the end of the battle regardless of what happens to the reserve unit
Observatories
- Crimson Observatory
- Horizon Observatory
- Nexus Observatory
Strategic Asset Granted: After both sides have finished deployment but before who gets the first turn has been decided. You may re-deploy up to D3 units.
Other Areas
- Rogue’s Refuge/Smuggler’s Cove
Strategic Asset Granted: When rolling for who has the first turn, you may change the result of your dice roll by either +1 or -1
- Starstone Circle/The First Settler
Strategic Asset Granted: Before the battle begins, select one unit. It gains the Scout special rule for the duration of this battle. The range of its scout ability is the same as the unit’s movement value.
- Starstone Portal
Strategic Asset Granted: One unit from your army gains the Deep Strike Special Rule for this battle.
However, the use of the Portal is not without its dangers. Roll a D6 for each model that was deployed using this Campaign Asset. For each roll of a 1, the unit suffers a Mortal Wound
The Oblivion’s Embrace – Space Hulk
The Oblivion’s Embrace is the massive Space Hulk which orbits the planet of Balecaster IV. This is an additional campaign map specifically designed for Boarding Actions games, where you can still capture useful strategic locations to help your alliance.
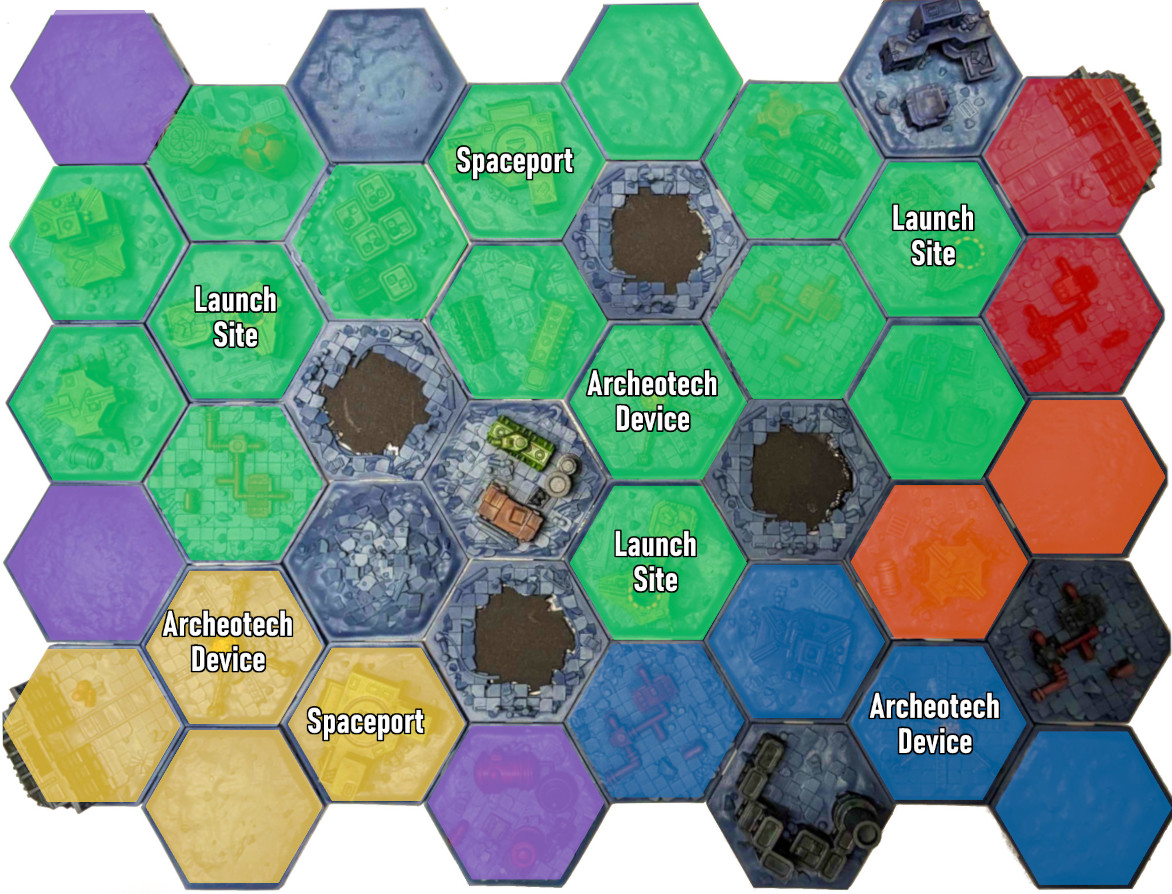
Space Hulk Locations
Archeotech Device
Strategic Asset Granted: Before the game begins, you may select 1 unit from your army, models in that unit improve their Objective Control score by 1
Spaceport
Strategic Asset Granted: During deployment, you may select one Battleline unit in your army to gain the Infiltrators Special Rule
Launch Site
Strategic Asset Granted: The controlling alliance may opt to bombard a hex on the surface. If done so, the team leader (or designated player) picks a hex and rolls a D6. On the roll of a 3+ the target is hit and the hex is replaced with a crator, any benefits it may have conferred are removed. All other hexes adjacent to the target hexes’ controlling forces are also removed. If a 1 or a 2 is rolled, the shot goes off target and scatters a number of hexes depending on the degree of failure.
Apply a -1 to hit modifier for each unclaimed hex adjacent to the launch site hex on the Orbital Map.