

As we get ready to kick of Phase 4 of our Crusade (the last full phase before the final battle), there have been quite a few developments and areas changing hands on the campaign map.
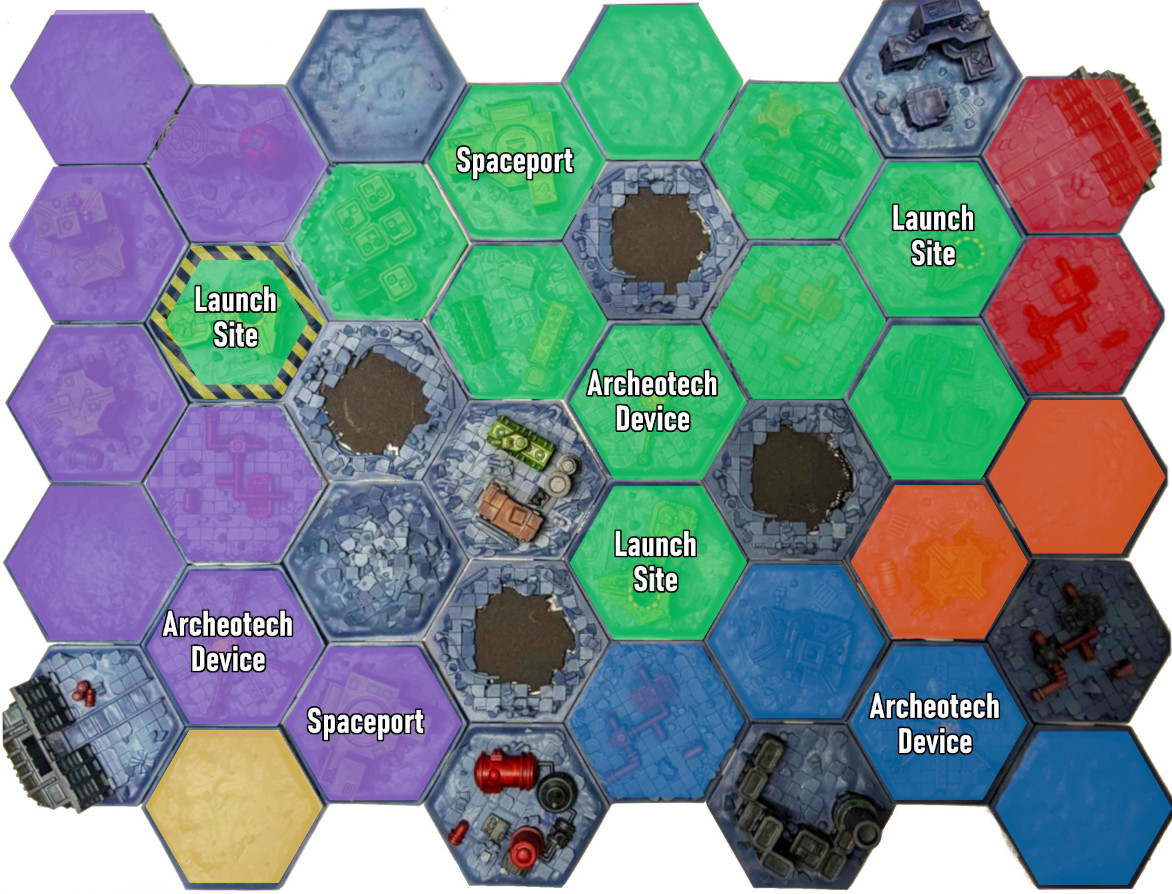
There were no changes to the Space Hulk map in week 12.
Week 12 Summary
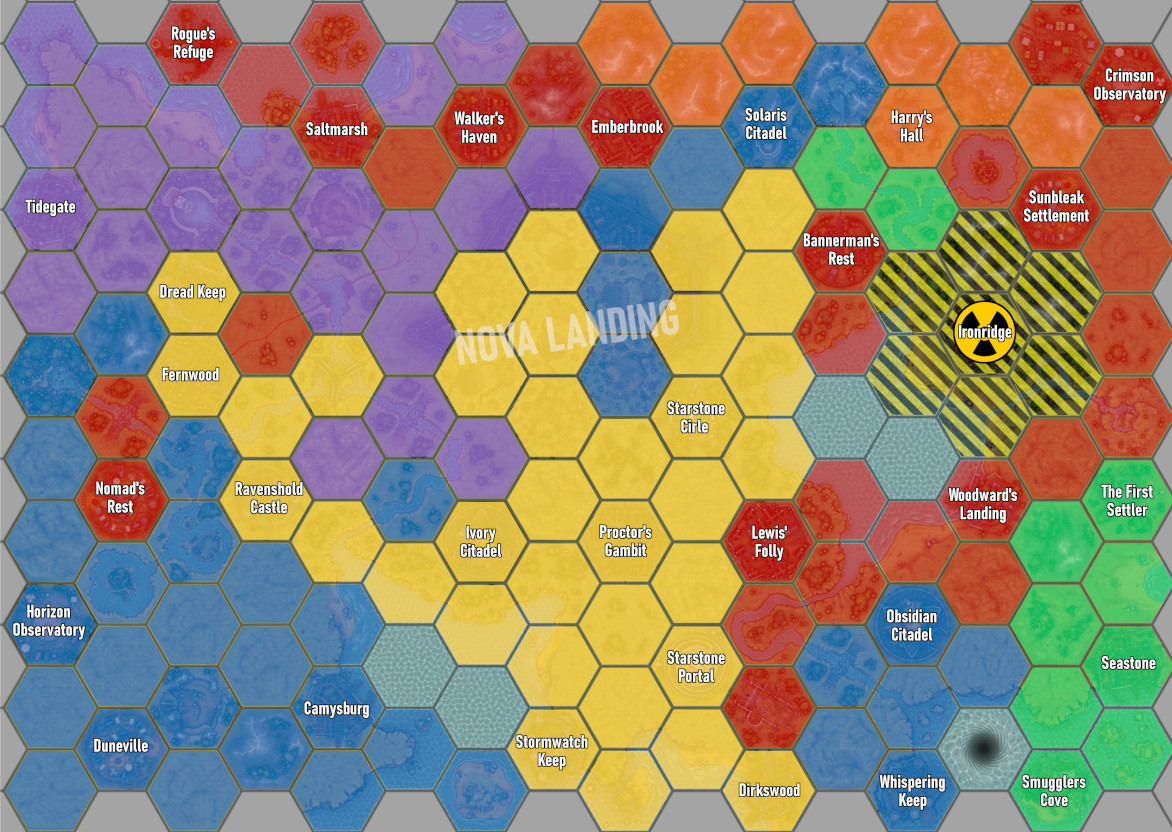
While the Purple Team have been focused on expanding their hold on the Space Hulk. The Red Team took full advantage and have fought their way into Purple Team‘s back lines, taking Emberbrook, Saltmarsh and Rouge’s Refuge, leaving Purple with a single town on the surface! The only Map buffs they will get going into Phase 4 will come from the Space Hulk!
Although there isn’t any buffs from controlling towns, the Red Team get full bragging rights for holding exactly half (8/16) of all towns on the map. It would have been 9 but someone nuked Ironridge.
Blue Team have expanded their control into both the Orange Team and Green Team‘s lands, cutting the Orange Team‘s territory in two. While also taking the Solaris Citadel off of them.
The Yellow Team also moved in on Orange, taking one of their hexes next to Bannerman’s Rest.
The Green Team pushed back the Reds, claiming the ruined monument of The First Settler. They also still control the last nuke (having fired the previous two) and have decided to sell it to the highest bidder in a blind auction. Which seems to have started a small bidding war, we will no doubt find out what happens on Thursday.
The Orange Team and Green Team have both been fought back to the point to qualify for the Desperate Holdout rule from the start of Phase 4. Which means it will be harder to take land off of them on the surface map.
Week 13/Start of Phase 4 Map Buffs
Purple Team
- Archeotech Device: Before the game begins, you may select 1 unit from your army, models in that unit improve their Objective Control score by 1.
- Spaceport: During deployment, you may select one Battleline unit in your army to gain the Infiltrators Special Rule.
Red Team
- Crimson Observatory: After both sides have finished deployment but before who gets the first turn has been decided. You may re-deploy up to D3 units.
- Rogue’s Refuge: When rolling for who has the first turn, you may change the result of your dice roll by either +1 or -1.
Blue Team
- Horizon Observatory: After both sides have finished deployment but before who gets the first turn has been decided. You may re-deploy up to D3 units.
- Whispering Keep: The first time a unit fails a Battle Shock test, you can choose to pass it instead.
- Solaris/Obsidian Citadel: During the game, the first friendly Battleline unit to be destroyed can be returned to the player’s army and placed in reserve. This unit will not gain any additional XP/etc the second time it enters the battle. The initial unit will still have to roll for its out of action tests at the end of the battle regardless of what happens to the reserve unit.
- Archeotech Device: Before the game begins, you may select 1 unit from your army, models in that unit improve their Objective Control score by 1.
Orange Team
- Harry’s Hall: The first time a unit fails a Battle Shock test, you can choose to pass it instead.
Desperate Holdout: A win against this team in a land battle will still grant their opponent 1 Hex on the land map. However, they will need to be beaten by 45 VPs for their opponent to take a 2nd Hex and 90 VPs for their opponent to take a 3rd Hex.
Green Team
- The First Settler: Before the battle begins, select one unit. It gains the Scout special rule for the duration of this battle. The range of its scout ability is the same as the unit’s movement value.
- Archeotech Device: Before the game begins, you may select 1 unit from your army, models in that unit improve their Objective Control score by 1.
- Spaceport: During deployment, you may select one Battleline unit in your army to gain the Infiltrators Special Rule.
- Smuggler’s Cove: When rolling for who has the first turn, you may change the result of your dice roll by either +1 or -1.
Desperate Holdout: A win against this team in a land battle will still grant their opponent 1 Hex on the land map. However, they will need to be beaten by 45 VPs for their opponent to take a 2nd Hex and 90 VPs for their opponent to take a 3rd Hex.
Yellow Team
- Dread Keep/Ivory Citadel: During the game, the first friendly Battleline unit to be destroyed can be returned to the player’s army and placed in reserve. This unit will not gain any additional XP/etc the second time it enters the battle. The initial unit will still have to roll for its out of action tests at the end of the battle regardless of what happens to the reserve unit.
- Ravenshold Castle/Stormwatch Keep: The first time a unit fails a Battle Shock test, you can choose to pass it instead.
- Starstone Portal: One unit from your army gains the Deep Strike Special Rule for this battle. However, the use of the Portal is not without its dangers. Roll a D6 for each model that was deployed using this Campaign Asset. For each roll of a 1, the unit suffers a Mortal Wound.
- Starstone Circle: Before the battle begins, select one unit. It gains the Scout special rule for the duration of this battle. The range of its scout ability is the same as the unit’s movement value.

The club’s Fabricator General, Lord of the Forge and all-round heretic 🙂


No responses yet